擴展 CentOS 7 /root partition 的容量(並且删除預設的 /home partition)

原文:https://gist.github.com/troyfontaine/87091bd6a5c68f45dd62ced3d12bc377

您需要有root的權限,並且可以透過ssh來進行操作。另外,需要注意您的系統中,沒有任何 services 正在 /home 中運行

這個示例,是假設您是使用默認方式安裝CentOS 7,並且您清楚明白知道 volumes/partitions 的情況,避免因不了解而做成嚴重破壞。

在默認情況下,CentOS 7 使用 XFS 作為 file system 和 Logical Volume Manager (LVM) 建立3個分區 / , /home 和 /swap

步驟 1 – 複制 /home 的內容

執行以下的指令為 /home 備份,注意:在備份前,您必須要確認 /temp/ 有足夠的空間存放 /home 的所有內容。若沒有足夠的空間,切勿繼續後面所有的步驟!

mkdir /temp
cp -a /home /temp/

當步驟1完成後,可以繼續步驟2的工作

步驟 2 – Unmount /home 目錄

umount -fl /home

步驟 3 – 查詢 home 在 LVM volume 的容量

用 lvs 指令來查詢 LVM volumes 的屬性

lvs

輸出例子:

  LV   VG Attr       LSize   Pool Origin Data%  Meta%  Move Log Cpy%Sync Convert
  home cl -wi-a----- 406.94g
  root cl -wi-ao----  50.00g
  swap cl -wi-ao----   7.81g

步驟 4 – 移除 home 的 LVM volume

指令:lvremove /dev/{VG 名稱 }/{LV名稱}, 本例子 VG 名稱 為 c1, LV 名稱 為 home

lvremove /dev/cl/home

步驟5 – 調整 root的 LVM volume的容量

在步驟3的輸出例子中,原本 home的 LSize 為 406.94g。我們可以安全地把root擴展406GiB。

指令:lvextend -L+{擴展容量} /dev/ {VG名稱} / {LV名稱}

lvextend -L+406G /dev/cl/root

步驟 6 – 調整 root partition 的分區容量

指令: xfs_growfs /dev/mapper/{VG名稱}{LV名稱}

xfs_growfs /dev/mapper/cl-root

步驟 7 – 把原本 /home 的檔案及文件,複制到 /home 的目錄中

cp -a /temp/home /

步驟 8 – 移除 /temp 目錄

rm -rf /temp

步驟 9 – 在 /etc/fstab 中移除項目

使用您習慣的文件編輯器,打開 /etc/fstab。並把 /dev/mapper/c1-home 這一行刪除或在該行最前第一個位加入#號

#/dev/mapper/c1-home /home xfs defaults 0 0

步驟 10 – 再後一個重要的步驟

執行以下指令,讓 systemd 同步,並且更改預設設定。

dracut --regenerate-all --force

ISPConfig 3 API, List all domain_id

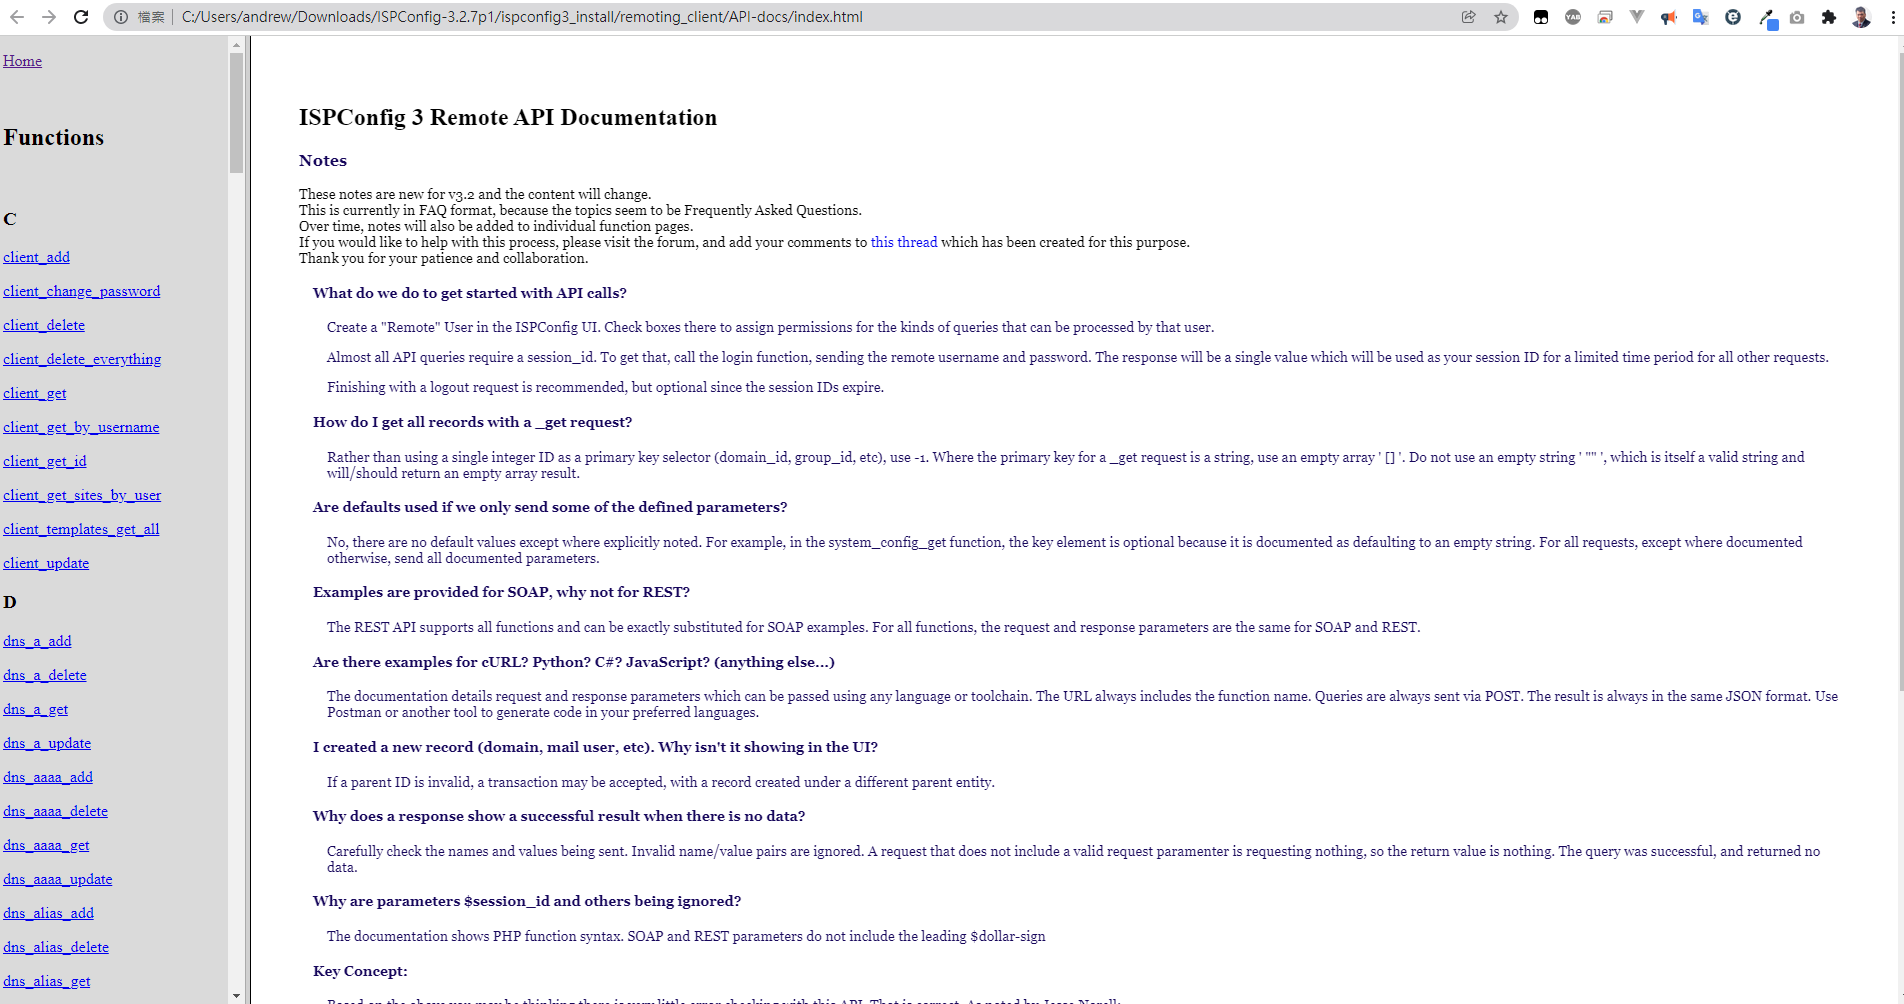
Attention: Before using this script, you MUST KNOW how to use ISPConfig API. If you are first time to learning ISPConfig API, Please go to see First time test ISPConfig API learning how to config, how to run it and how to debug with https.

File name: sites_web_domain_id_get_all.php
<?php

require 'soap_config.php';

$context = stream_context_create([
    'ssl' => [
        // set some SSL/TLS specific options
        'verify_peer' => false,
        'verify_peer_name' => false,
        'allow_self_signed' => true
    ]
]);

$client = new SoapClient(null, array('location' => $soap_location,
                'uri'      => $soap_uri,
                'trace' => 1,
                'exceptions' => 1,
                'stream_context' => $context));

try {
        if($session_id = $client->login($username, $password)) {
                echo 'Logged successfull. Session ID:'.$session_id.'<br />';
        }


        $domain_record = $client->sites_web_domain_get($session_id, []);
        $domain_ids = array_column($domain_record, 'domain_id');


        print_r($domain_ids);

        if($client->logout($session_id)) {
                echo 'Logged out.<br />';
        }


} catch (SoapFault $e) {
        echo $client->__getLastResponse();
        die('SOAP Error: '.$e->getMessage());
}

?>

First time test ISPConfig API

  • After Install ISPConfig , the application would not saved any API Example or Document. So, we need to find out the example scripts at the source file and copy them to /usr/local/ispconfig.
cd /tmp 
wget -O ispconfig.tar.gz https://www.ispconfig.org/downloads/ISPConfig-3-stable.tar.gz
tar xfz ispconfig.tar.gz
cd ispconfig3_install/
cp -R remoting_client/ /usr/local/ispconfig/
cd /usr/local/ispconfig/remoting_client
  • All API Document and example file was copied to /usr/local/ispconfig/remoting_client
  • ISPConfig add Remote Users
ISPConfig Web UI > system > Remote User > Add new user

Entry username & password, And click what do you want function. In first test, please click all Functions. Please remember username & password for modify API config file .

save
  • Modify API config file
cd /usr/local/ispconfig/remoting_client/examples/
nano soap_config.php
<?php

$username = 'admin';
$password = 'admin1234';

/*
$soap_location = 'http://localhost:8080/ispconfig3_3.0.5/interface/web/remote/index.php';
$soap_uri = 'http://localhost:8080/ispconfig3_3.0.5/interface/web/remote/';
*/


$soap_location = 'https://192.168.1.100:8080/remote/index.php';
$soap_uri = 'https://192.168.1.100:8080/remote/';


?>

Change to

<?php

$username = 'username';
$password = 'password';

/*
$soap_location = 'http://localhost:8080/ispconfig3_3.0.5/interface/web/remote/index.php';
$soap_uri = 'http://localhost:8080/ispconfig3_3.0.5/interface/web/remote/';
*/


$soap_location = 'https://localhost:8080/remote/index.php';
$soap_uri = 'https://localhost:8080/remote/';


?>
  • Test First API
php system_config_get.php

If every was ok, you will see the follow message.

Logged successfull. Session ID:qd0758c7265f2498285bef4e2f7ba4a3a25f8c7e3<br />Array
(
    [company_name] => Innonext
    [custom_login_text] =>
    [custom_login_link] =>
    [dashboard_atom_url_admin] => https://www.ispconfig.org/atom
    [dashboard_atom_url_reseller] => https://www.ispconfig.org/atom
    [dashboard_atom_url_client] => https://www.ispconfig.org/atom
    [tab_change_discard] => n
    [tab_change_warning] => n
    [use_loadindicator] => y
    [use_combobox] => y
    [show_support_messages] => y
    [maintenance_mode] => n
    [maintenance_mode_exclude_ips] =>
    [admin_dashlets_left] =>
    [admin_dashlets_right] =>
    [reseller_dashlets_left] =>
    [reseller_dashlets_right] =>
    [client_dashlets_left] =>
    [client_dashlets_right] =>
    [customer_no_template] => C[CUSTOMER_NO]
    [customer_no_start] => 1
    [customer_no_counter] => 5
    [session_timeout] => 0
    [session_allow_endless] => n
    [min_password_length] => 8
    [min_password_strength] => 3
)
  • Normally, It was Done! BUG

But some API have some BUG and not work. This is because the normally working API was disabled ‘ssl verify peer’ when using https connect. So, we need add ‘disabled ssl verify peer’ in not work API.

Test sites_web_domain_get.php, you will get a error message ‘SOAP Error: Could not connect to host

php sites_web_domain_get.php
SOAP Error: Could not connect to host[root@system]#

Fix method, Edit sites_web_domain_get.php

<?php

require 'soap_config.php';

{add something here}

$client = new SoapClient(null, array('location' => $soap_location,
                'uri'      => $soap_uri,
                'trace' => 1,
                'exceptions' => 1{add something here}));


try {
        if($session_id = $client->login($username, $password)) {
                echo 'Logged successfull. Session ID:'.$session_id.'<br />';
        }

        //* Set the function parameters.
        $subdomain_id = 10;

        $subdomain_record = $client->sites_web_subdomain_get($session_id, $subdomain_id);

        print_r($subdomain_record);

        if($client->logout($session_id)) {
                echo 'Logged out.<br />';
        }


} catch (SoapFault $e) {
        echo $client->__getLastResponse();
        die('SOAP Error: '.$e->getMessage());
}

?>

Change to

<?php

require 'soap_config.php';

$context = stream_context_create([
    'ssl' => [
        // set some SSL/TLS specific options
        'verify_peer' => false,
        'verify_peer_name' => false,
        'allow_self_signed' => true
    ]
]);

$client = new SoapClient(null, array('location' => $soap_location,
                'uri'      => $soap_uri,
                'trace' => 1,
                'exceptions' => 1,
                'stream_context' => $context));

try {
        if($session_id = $client->login($username, $password)) {
                echo 'Logged successfull. Session ID:'.$session_id.'<br />';
        }

        //* Set the function parameters.
        $subdomain_id = 10;

        $subdomain_record = $client->sites_web_subdomain_get($session_id, $subdomain_id);

        print_r($subdomain_record);

        if($client->logout($session_id)) {
                echo 'Logged out.<br />';
        }


} catch (SoapFault $e) {
        echo $client->__getLastResponse();
        die('SOAP Error: '.$e->getMessage());
}

?>

Test sites_web_domain_get.php again

php sites_web_domain_get.php
Logged successfull. Session ID:u3712304db1b527b09cbe8582f141f0614331d551<br />Logged out.<br />[root@system]#
  • Everything Done.
  • You may not research other API in /usr/local/ispconfig/remoting_client/examples.
  • About API Document, you may direct file download to you desktop computer.

https://www.ispconfig.org/downloads/ISPConfig-3-stable.tar.gz

Extract ISPConfig-3-stable.tar.gz in your PC.

You may find a file in extracted folder and run it, Ispconfig3_install\remoting_client\API-docs\index.html

Backup script example, Auto Make directory, Prepare date file name, dump mySQL, Auto rename old backup files with index code, rsync data

#!/bin/bash
basedir=/var/backup/store
sqldir=$basedir/sql
PATH=/bin:/usr/bin:/sbin:/usr/sbin; export PATH
export LANG=C

for dirs in $basedir
do
        [ ! -d "$dirs" ] && mkdir -p $dirs
done

for dirs in $sqldir
do
        [ ! -d "$dirs" ] && mkdir -p $dirs
done


param1=$(date +%Y-%m-%d-%H-%M-%S)

# Database Backup
sqlusername=root
sqlpassword=Z2PG82SMtQzD
mysqldump=/usr/bin/mysqldump
bwlimit=--bwlimit=100K
#bwlimit=

sqldbname=dbispconfig
sqlsavetarget=$sqldir/$sqldbname.sql
rm -rf $sqlsavetarget.7
mv $sqlsavetarget.6 $sqlsavetarget.7
mv $sqlsavetarget.5 $sqlsavetarget.6
mv $sqlsavetarget.4 $sqlsavetarget.5
mv $sqlsavetarget.3 $sqlsavetarget.4
mv $sqlsavetarget.2 $sqlsavetarget.3
mv $sqlsavetarget.1 $sqlsavetarget.2
mv $sqlsavetarget $sqlsavetarget.1
$mysqldump -u $sqlusername -p$sqlpassword --skip-lock-tables -R $sqldbname > $sqlsavetarget

/usr/bin/rsync -ah $bwlimit --delete /etc $basedir
/usr/bin/rsync -ah $bwlimit --delete /usr/local/ispconfig $basedir

Prevent duplicate shell script executions

Method #1, pidof

I have a /var/backup/systemBackup.sh for system backup.

edit /var/backup/runsystemBackup.sh

#!/bin/bash

if pidof -x "systemBackup.sh" >/dev/null; then
        echo "Process already running"
        exit 0
fi
/var/backup/systemBackup.sh  > /dev/null &

try run /var/backup/runsystemBackup.sh

Method #2, lock file

I have a /var/backup/systemBackup.sh for system backup.

edit /var/backup/runsystemBackup.sh

#!/bin/sh

lockdir=/tmp
BACKUP=/var/backup/systemBackup.sh
LOGGER=/usr/bin/logger

if [ ! -f /$lockdir/systemBackup.sh ]; then
        touch $lockdir/systemBackup.sh

        $BACKUP
        rm $lockdir/systemBackup.sh

else
        echo "systemBackup.sh already running"
        $LOGGER -d -t SYSTEM_Backup "systemBackup.sh already running"
fi

try run /var/backup/runsystemBackup.sh

Method #3, flock with cron job

# m h dom mon dow user  command
5 0  *  *  * flock -w 0 /tmp/sqlbackup.sh.lock /var/backup/systemBackup.sh

Fixed WordPress Images not showing up with HTTPS

Step 1. Appearance > Theme Editor

Step 2. Find header.php at right side {Theme Files}

In my case, I can’t find header.php. So, I click Writers Blogily.

I found Theme Header (header.php) and click it.

Add a meta in html head

<meta http-equiv="Content-Security-Policy" content="upgrade-insecure-requests">

click update file button on bottom

Complete! this problem was fixed

Fixed MySQL replication slave got Last_SQL_Errno: 1062

If you don’t want REDO the complete procedure, a good fix would be to use

STOP SLAVE;    
SET GLOBAL sql_slave_skip_counter=1;
START SLAVE;

If there are too many such errors, a good idea would be to automate it using a bash script.

Reference : Ut xD(2017), https://serverfault.com/questions/336888/what-causes-the-mysql-error-1062-duplicate-entry-when-starting-slave, Last visit at Jan 2022